Visual Editor Role: Find and format visually appealing photos for articles being published on the blog and magazine. The Visual Editor is responsible for the overall appearance of the article.
They take articles from the “uploaded” folder. They check inbound/outbound links to make sure the font is the right size, select a photo, size and format it appropriately, add the focus keyword to the photo, and then format sources for the photo. This edit is all about the visual appearance of the article.
Training:
- Be familiar with the blog and Magazine. They have different photo requirements. Spend a few minutes skimming through articles and getting a feel for the style.
- If you have/use Photoshop, you may want to use it to prepare your photos.
- Check out webresizer and pixlr. You will be using them for your photo adds.
- Prepare a folder on your computer where you will keep all of your Borgen visual edits. (You will be adding so many, so you might do this to stay organized).
- Become familiar with photo optimization.
Editing Chain
Below outlines the folder categories that articles go through and the roles of each Editor.

Basic Steps of a Visual Editor:
- Once logged in, click “posts.”
- Go to articles in the “Edit 1 complete” folder.
- Choose article
- In the News Team and Assignment Desk document on in the “Articles Underway” tab, list your name and the date next to the article you worked on.
- Find a photo (More info below)
- Upload photo
- Format sources for the photo
- Edit overall appearance of the article
- Save the article and change the status to “Photo Added”
Blog Photo Editing Steps:
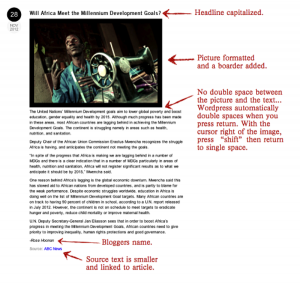
How a blog post should look

Finding Photos
Note: Do not use images from a photographers website and/or any website that charges for images.
Try to only use the sites below for finding images or sites that allow image usage (creative commons or no rights reserved photos). Photos before 1920’s are safe to use, so feel free to get creative.
- Flickr Create Commons
- BigFoto.com
- MorgueFile.com
- FreeMediaGoo.com
- Pixabay.com
- Everystockphoto.
com - UN Multimedia: username: [email protected] – password: 3sujju2o
Note: photographs on any U.S. government site are public domain, so check out sites like USAID, CIA World Factbook, whitehouse.gov, etc.
******* Now that you have found a photo make sure to paste the entire URL into the bottom of the article (you will need it later).
Resize Photo

1. Visit http://webresizer.com/resizer/
2. Blog photo size should be 400 wide by 260- 280 pixels. (Use the crop feature to get it exactly right)

Stylize Photo

1. Go to http://pixlr.com/o-matic/
2. Select the computer icon to upload a photo.
3. Use the red, blue, and yellow half circle icon to style the image. We’re trying to keep a consistent brand/look for the blog so try to follow the formula below.
4. Red adjusts the filter. You have a lot of freedom here, but make sure the tint doesn’t make the image too dark or hard to view. Salomon, Peter, Tony and Sophia are frequent favorites.
5. We don’t typically use the Blue section of the half circle icon, for clarity’s sake.
6. Yellow is a must and gives the image a frame. We want all images to have a black frame.
![]()
SEO
When downloading the resized image, rename it as the Focus Keyword. The Focus Keyword is located just below the article in the WordPress SEO By Yoast box. (Bill_Smith.jpg, Sudan_Refugees_Flee_to_Africa.jpg)
Upload Photo
To add the photo to the blog, click the “Add Media” tab above the article. Then click “upload.”
Make sure the Focus Keyword is in the “Alt Text” line. The focus keyword must be EXACTLY the same. If the keyword is “Hunger in Nigeria” then you must put “Hunger_in_Nigeria” NOT “Hunger_Nigeria”
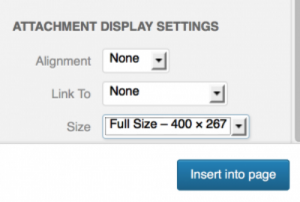
Next, make sure that there is nothing in either the “Caption” box, the “Description” box, the alignment is “none” and the “Link To” is “none.”

WARNING!
When you upload the photo, make sure the attachment settings are set to “Full Size.” If it’s set to medium or small, the image won’t be the correct size.

**The image is as important as the article. A good image draws people in and increases the likelihood of them reading your story. You can use Google Image search to find images that pertain to your topic. As long as you cite the source, you can use images from just about anywhere on the web. Please be creative in your search. We have a thousand photos of African children standing around a village or of the Capitol building in Washington, D.C. Try to find unique images or ways to express the article’s idea.
The Gap
One last thing…
There should never be a gap between the photo and the first line of text in the article. To fix this you can do one of two things.
-
- Delete the gap until the text is next to the photo. Then hit “shift + enter.” The text should now be directly under the photo.
- OR simply go back into the Text tab. You will be able to delete the gap directly by just hitting delete. It will look like this:

But we want it to look like this:

Review
All images should be…
- Resized with webresizer.com. This is a simple tool for keeping images the same width and heighth, while decreasing the file size. If the images are slow to load, beyond annoying the reader, it also hurts our search engine ranking. Google doesn’t like to send people to slow pages.
- Styled. Use pixlr.com/o-matic/.
- Renamed. To help the chances of people finding your article when searching images, rename your photo as the Focus Keyword. For example, if the image above was called “12244355.jpg.” When downloading it, you would save it as “United_nations_donation.jpg.”
Adding Photo Source Coding:
1. From the article, switch to the Text tab.

2. Paste the following code into the bottom of your article under the coding for the sources goes:
<span style=”color: #888888; font-size: xx-small;”>Photo: </span> <a href=”SITE URL GOES HERE” target=”_blank”><span style=”color: #2200fc; font-size: xx-small;”>SITE NAME GOES HERE</span></a>
3. Now paste in the actual link you used, and give it a name.
Example:
<span style=”color: #888888; font-size: xx-small;”>Photo: </span> <a href=”www.nytimes.com/nelson_mandela_peace_talk” target=”_blank”><span style=”color: #2200fc; font-size: xx-small;”>New York Times</span></a>
Note: If you have multiple sources (if you are making use commas to separate: Times, The Washington Post
Example:
<span style=”color: #888888; font-size: xx-small;”>Photo: </span> <a href=”www.nytimes.com/nelson_mandela_peace_talk” target=”_blank”><span style=”color: #2200fc; font-size: xx-small;”>New York Times,</span></a> <a href=”www.washingtonpost.com/g8_summit” target=”_blank”><span style=”color: #2200fc; font-size: xx-small;”>Washington Post</span></a>
The highlighted part in blue shows the comma, and then I just copy/pasted the same line of code <a href=”SITE URL GOES HERE” target=”_blank”><span style=”color: #2200fc; font-size: xx-small;”>SITE NAME GOES HERE</span></a> one space after the end of the sequence (</a>).
4. Switch back to the “Visual” tab and check to make sure everything looks good.
DIFFERENCEs BETWEEN BLOG AND MAGAZINE PHOTOS VERY IMPORTANT
| Stylized | Border | Uploaded to Featured Image | Dimensions | Rename (Focus Keyword) | Dateline | |
| Blog | YES | YES (but not on white background) | NO | 400 x 260-280 | YES | NO |
| Magazine | NO | NO | YES | 1078 x 516 (minimum) | YES | YES |
GET CREATIVE
Whenever possible, you should use creative or funny images. In the past, we’ve struggled with the blog and magazine being an endless stream of articles showing pictures of poor people… Not surprising since our topic is poverty. However, we’re trying to find ways to visually cover the topic of poverty with a limited number of the doom and gloom photos. Below are a few good examples of thinking outside the box.


Final Checklist:
1. Did the 1st round editor add a dateline? If not add one! (For the magazine only)
2. Resize the photo (Mag and blog)
3. Stylize the photo (blog only)
4. Make sure the photo doesn’t have a link
5. Make sure the photo doesn’t have a caption
6. Make sure the photo doesn’t have a description
7. Make sure the photo is full size
8. Put the focus keyword as the Alt Tag. It must be exactly the same!
9. Source the photo. Remember if you found the photo on one the sources that was already cited, then you do NOT have to cite it again.
10. Double check that any inbound/ outbound links (they will be in blue) are the same text size as all the other text.
